On Black Friday I was able to do a little shopping at Jo-Ann Fabrics. They had a 30% off coupon on top of already low sale prices. I mostly purchased Christmas decor and found these jumbo white wood letters for 40% off. I instantly got an idea to alter them for my house and make them pretty, so I snatched them up and came straight home to decorate. Afterall, the day after Christmas decorating is our tradition!!
I paid about 90 cents for each letter, plus $2 for a bottle of silver glitter. The rest of the supplies I already had in my craftroom. This project cost me less than $5 to create and quickly became my most favorite and easiest project EVUH!! I loved making it and I loved adding it to this year's new holiday decor. Every 3 years we change color schemes. We've been wanting this color scheme for 2 years now, and are so glad we finally decided to change.
I searched everywhere for a tutorial on this and couldn't find one... even on Pinterest. So I had to create my own and decided to share it with you. I hope it's easy for you to replicate and I hope you have fun doing it.
LET'S GET CRAFTY!!!
I adhered strips of tape in a diagonal form on each letter. I used this black tape because it was the first I found. You can use scotch tape as well.


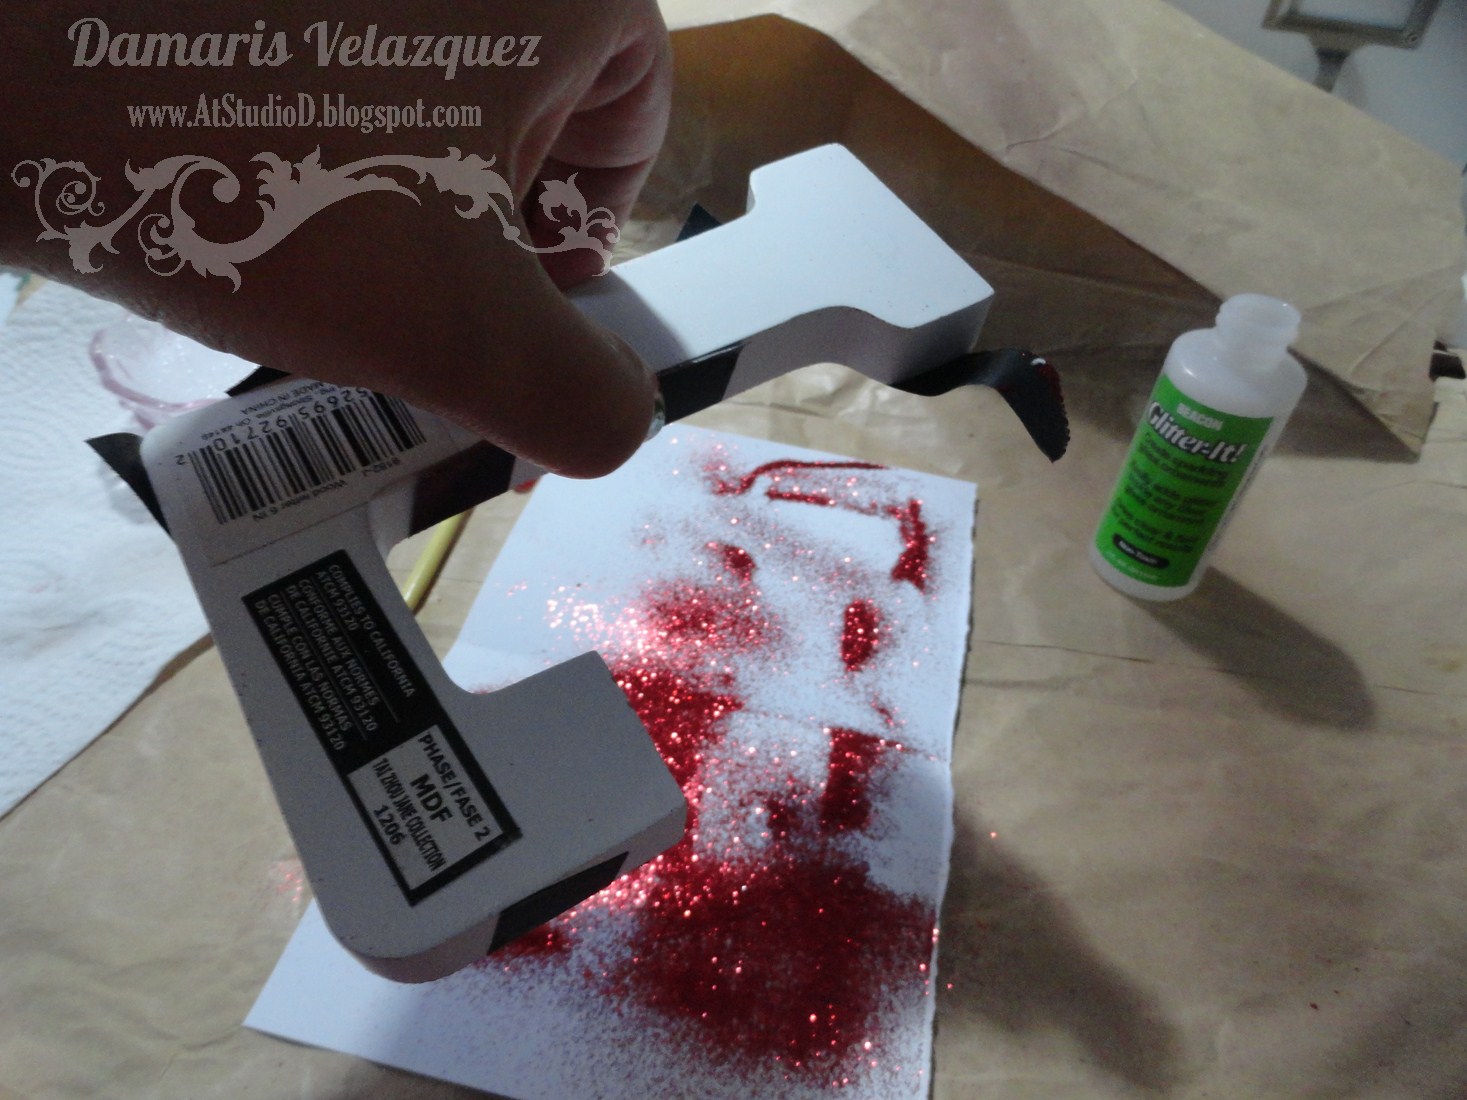
I ended up using GLITTER IT, since it's the popular brand that's used to alter clear ornaments.

I used a paintbrush to lay on a layer of this substance all over the letter.
I didn't do any prepping on the wood, minus using the tape.

I sprinkled the glitter directly over the tape and glue.
Make sure you are very liberal with the glitter or else you will have to repeat this process later on...
.. as I had to do.

Press down on the glitter so that it adheres well to the sticky substance.

Shake off the glitter on a scratch paper, so that you're able to pour it back into the bottle and reuse it.
Pull off the tape pieces gently while the glitter and substance are still semi-wet.
Then with a clean & smaller paintbrush, begin to brush away the loose glitter particles.
Make sure you brush off the sides and back of the wood letter, because it gets EVERYWHERE!!
You want a sharp line to represent Candy Cane stripes.


Repeat the same exact process with the other letters.


If there are patches of missing glitter, just let it dry completely for a day, brush on more GLITTER-IT, add the glitter, press down, shake off and let dry all over again.
You will not need the tape since you are only adding the adhesive substance to the patches.
Use your clean tiny paintbrush to brush away the loose particles and clean up those edges.


It looks MUCH better now...

And it looks even better in my kitchen, as part of my breakfast table Christmas decor.


This has ABSOLUTELY been my FAVORITE altered project this year. It's super easy and super fun. I think I'll make a new glittered word with these wood letters every holiday until I have collected them all... even BAH HUMBUG!! haha.
Thanks for checking in today and please take time to PIN this project to your PINTEREST boards... if you do, leave me a SECOND comment and let me know what Christmas decorations you have in your kitchen, if any.

~~~~~~~~~~~~~~~~~~~~~~~~~~~~~~~~~~~~~~~~~~~~~~~
To Win Santa's Blog Candy,
And 2 Grand Prize winners!!


27 comments
Absolutely gorgeous!! The letters look amazing!! Have a great day :)
Lisa
A Mermaid's Crafts
These look fabulous I love them. Caroline xxx
these are just lovely!! love them...
I've pinned it onto my craft board
http://pinterest.com/pin/344947652678664574/
Beautiful Christmas decor!
Oh my goodness, I love this. Thanks for sharing how you made it.
EEEK! I just love this. So pretty. Fabulous tutorial.
Be blessed, Beckie
Stampin' Up Ind Demo
http://justbcreativecrazy.blogspot.com
This is so fun and love the glitter! I'm impressed with all your projects...so far all I've done is procrastinate. :/
Thanks for the inspiration! :)
Damaris, I can see why this would be one of your favorite projects so far, its adorable! hugz
I don't put a lot of decorations in the kitchen, I always decorate my table and a few candy dishes and thats about it, hugz
I LOVE LOVE LOVE this project!! What a great idea and it turned out gorgeous!!!
I pinned this also....
http://pinterest.com/pin/148407750192520221/
Love this idea!!
Love!Love!Love!Absolutely FABULOUS!!!
Have a wonderful Tuesday,
Migdalia
I pinned here
http://pinterest.com/resatwo/christmas/
I love super easy projects. This one is great. I love you colors. Red is usually what I use for Christmas but this year we went with pinks and purples.
What a sweet idea! It looks so cool on the table too.
The striped glittered letters look so festive. In my kitchen I have crocheted Christmas doilies & dishcloths. I also have Christmas tins above my cupboards.
Melissa
"Sunshine HoneyBee"
This is absolutely gorgeous!! What a wonderful addition to your breakfast table over the festive season!! HUgsxx
These look fantatastic love all the glitter :)
The letters look amazing
Love all the glitter. what an amazing project. Thanks for sharing!!
I posted your project to Pintrest here: http://pinterest.com/pin/275001120967990733/
I dont have holiday decorations up because we are NEVER home for the Xmas holidays but always travel out of town each year.
omgoodness! I love this Damaris, you are so creative :)....Fabi xxxx
Great project! I just love how it looks the whole set with the other ornaments too!!!!!!
Pinned here;
http://pinterest.com/pin/118641771405438803/
I have no decoration up in my kitchen. Just how I roll.
SHUSH! so awesome! i love this - can see this for SO many fabby projects. wonder if i have time to squeeeeeze in some more crafting?!
Preciosas!!!! Te han quedado espectaculares, es una idea genial!!!, muchas gracias por compartir, besitos
Post a Comment